That cracked spine on your grandmother’s recipe book isn’t a death sentence. Most people toss a damaged book or spend $40 to $80 at a professional bindery, but the truth is that the majority of common binding failures are fixable on your kitchen table with about $15 in supplies and a free afternoon.
This guide covers how to rebind a book from start to finish, including how to repair a book spine, reattach loose pages, fix a hardcover, and restore old books that feel like they’re one page-turn away from collapse. Whether your copy is a beloved paperback or a century-old hardcover, the fix is closer than you think.
Why Books Fall Apart (And Why It Matters for Your Repair Plan)
Before you grab glue and tape, you need to diagnose what actually broke. Applying the wrong repair to the wrong failure is the number one reason DIY book repairs look terrible six months later.
Book binding failure almost always traces back to four culprits: adhesive breakdown, mechanical stress on the spine, paper brittleness from acid degradation, or simple hinge failure at the joint where the cover meets the text block. Each requires a different fix.
Book rebinding in the full sense, meaning completely reattaching a text block to a new or repaired cover, is only necessary when two or more of these failures occur together.
Here’s what each failure looks like in practice. Adhesive breakdown shows up as pages pulling away from the spine in clumps or sections.
Hinge failure looks like the cover lifting completely away from the book while the text block stays intact. A broken spine often appears as a visible crack running lengthwise along the back, sometimes accompanied by a popping sound when you open the book flat.
Loose individual pages usually mean the original binding thread or glue failed at a single signature boundary.
Identify which one (or which combination) you’re dealing with before you read another word below. The steps branch from here.
Book Binding Supplies You Actually Need
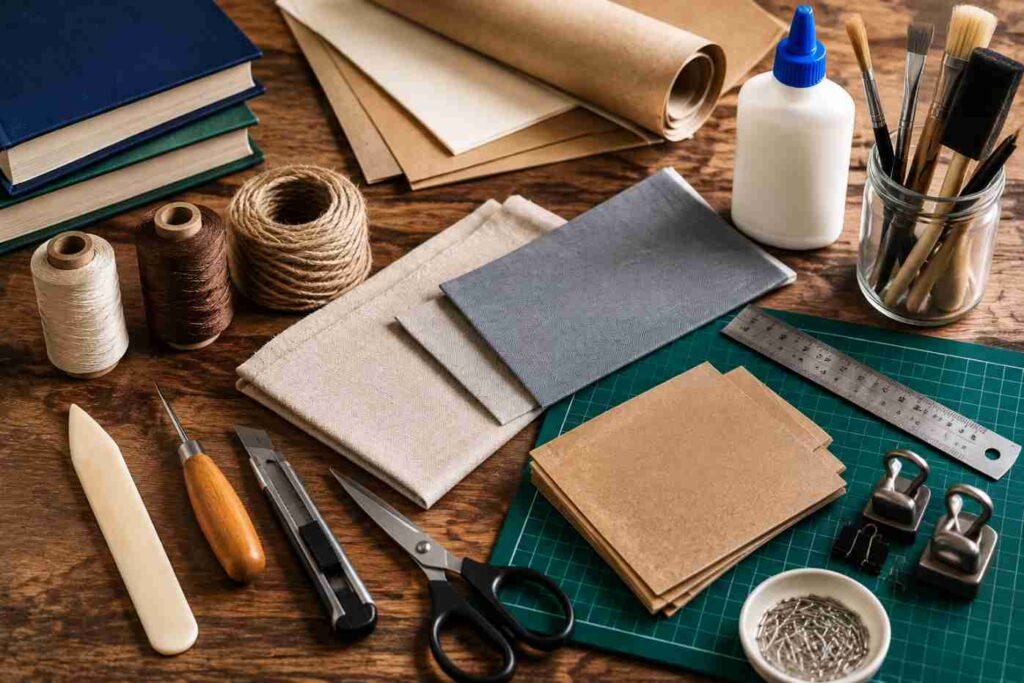
Good news: the supply list is short. Bad news: the wrong version of any item on this list will ruin your repair. I’ve made this mistake personally, using standard white PVA craft glue instead of bookbinding PVA, and the repair turned brittle and yellow within a year.
| Supply | Recommended Spec | Approximate Cost | Where to Source
|
|---|---|---|---|
| Bookbinding PVA glue | Acid-free, flexible when dry | $8 to $14 for 4 oz | Talas Online, Amazon |
| Book spine repair tape | Buckram cloth or Japanese tissue | $6 to $18 per roll | Brodart, Gaylord Archival |
| Bone folder | Teflon or genuine bone | $5 to $12 | Dick Blick, Amazon |
| Wax paper | Standard kitchen grade | Under $3 | Any grocery store |
| Book press or heavy weights | Flat, even pressure across full cover | $0 (use textbooks) | Already in your house |
| Microspatula or butter knife | Thin, flexible blade | $4 to $9 | Dick Blick, craft stores |
| Binder’s needle and linen thread | 18/3 or 25/3 waxed linen | $6 to $10 | Talas Online, Hollanders |
The one supply that trips people up most is book spine repair tape. Hardware store duct tape and packing tape are not substitutes. They off-gas acids that will destroy old paper, and they fail to flex with the spine during repeated openings. Use either Japanese tissue tape for archival work or library-grade buckram cloth tape for functional everyday repairs. Talas Online is the go-to supplier for serious book binding supplies in the US.
If you’re curious why binding choices matter this much in the first place, coffee table book format and binding specs breaks down why publishers choose sewn binding over perfect binding for books meant to last.
How to Rebind a Book: The Full Step-by-Step Process
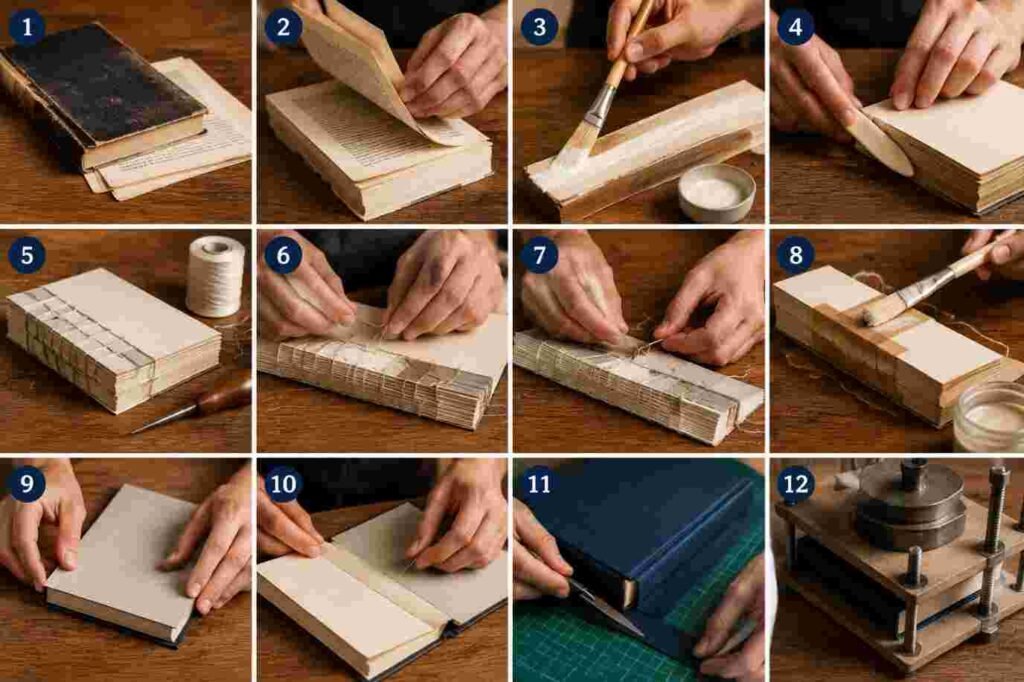
This section covers a complete rebind, meaning you’re reattaching a text block to its hardcover boards. If your problem is narrower, jump ahead to the specific repair sections below. But reading this full process first will help you understand why each step matters, even for simpler fixes.
Step 1: Separate the Text Block From the Cover
Open the book to the first page. You’ll see the endpaper, the decorative page glued to the inside of the front cover. Slide your microspatula or a thin butter knife very gently along the joint between the endpaper and the cover board. Work slowly. The goal is to separate the glued connection without tearing the paper. Do the same at the back. Once both endpapers are freed, the entire text block, all the interior pages, should lift free of the cover.
Step 2: Clean the Old Spine
With the text block separated, look at the spine. You’ll likely find old dried glue, remnants of cloth tape, and sometimes fragments of the original mull, a thin gauze fabric used to reinforce the spine. Gently scrape all of this away using your microspatula. Don’t use water unless the book is being fully restored, since moisture warps paper fast. The goal is a clean, flat spine surface you can work fresh adhesive into.
Step 3: Re-glue the Spine
Fan the pages slightly, then apply a thin, even coat of bookbinding PVA along the entire length of the spine edge. Work the glue into the gaps between signatures, which are the folded sections that make up a book’s text block. Let this coat dry for 20 minutes, then apply a second thin coat.
While the second coat is still tacky, cut a strip of mull or cheesecloth slightly shorter than the spine height and press it firmly along the spine. Smooth out bubbles. Let the whole assembly dry completely, at least four hours.
Step 4: Reattach to the Cover
Apply a thin coat of PVA to the inside spine of the hardcover and to the exposed mull strip on the text block. Align the text block carefully inside the cover, making sure the top and bottom overhang of the cover boards are even. This is called the square, and getting it right matters visually.
Press the assembly firmly together, then tuck wax paper between the endpapers and the cover boards before clamping or weighting the book. The wax paper stops any squeeze-out glue from bonding your endpapers permanently to the wrong surface.
Step 5: Apply Spine Reinforcement Tape
Once the book is dry, cut a strip of book spine repair tape to run the full height of the spine, adding about half an inch on each side. Press this firmly over the spine and onto the cover boards, using your bone folder to burnish out any air pockets. This reinforces the hinge joint, the exact spot where most hardcover binding failures start.
Step 6: Cure Under Pressure
Stack the book under at least 20 pounds of flat weight for a minimum of 12 hours. I use a stack of hardcover art books plus a piece of plywood to distribute the load evenly. Skipping or shortening this step is the fastest way to end up with a repair that looks perfect on day one and warps by day five.
How to Repair a Book Spine Without Full Rebinding
Not every broken book needs a full rebind. If the covers are structurally sound and the pages are all intact but the spine is cracked or flaking, you can do a targeted spine repair in about an hour.
This is the most common scenario for diy book binding repair, and honestly, it’s satisfying work. The process for how to repair a book spine on its own goes like this: clean any loose material from the spine surface, apply a thin coat of flexible PVA glue with a small brush, press any lifting spine material back down, then cover the entire spine with a strip of book spine repair tape that extends slightly onto both cover boards. Use your bone folder to press out every bubble. Let it dry under weight.
For a cracked paperback spine, the same approach works, but use a lighter touch with the PVA since paperback covers are thinner and can buckle if you apply too much moisture. Japanese tissue tape is my first choice for paperback spine repair because it’s thin enough to be nearly invisible once it settles in.
The Library of Congress book care guidelines specifically recommend flexible adhesives for spine repairs because rigid glues crack under the repeated stress of opening and closing. That’s not a small detail. It’s the entire reason standard white craft glue fails on books.
How to Fix a Hardcover Book With a Broken Hinge
A broken hinge is distinct from a broken spine. The hinge is the flexible groove running vertically along the inside of the cover, right where the cover meets the text block. When a hardcover book’s hinge cracks, the cover swings open freely and the book feels loose and sloppy even if the pages are fine.
Here’s a reliable method for how to fix a hardcover book with this exact problem. Open the damaged cover as flat as it will go. Using your microspatula or a thin strip of wax paper as a carrier, work a thin bead of bookbinding PVA deep into the hinge groove.
The key is getting the glue all the way down to the spine, not just coating the surface. Close the cover gently. Slide a strip of wax paper between the cover and the first page. Stand the book upright, spine down, and rubber band it closed loosely. Let it cure for eight to twelve hours.
Once dry, open carefully. If the hinge still feels weak, reinforce it from the outside with a strip of book spine repair tape running the full height of the cover joint. This external reinforcement won’t look quite as clean as an internal repair, but it adds significant mechanical strength and is a standard library technique for books that get heavy daily use.
How to Repair Loose Book Pages
Individual loose pages are a separate problem, and the fix depends on whether the page is completely detached or still partially connected. How to repair loose book pages that are completely detached involves tipping them back in with a thin strip of PVA along the page’s inner edge, then pressing the book closed under weight until fully cured.
But if multiple pages in the same section are coming loose, you’ve got a failed signature. A signature is a folded group of pages, usually eight to thirty-two pages, sewn together as a unit. When one signature’s sewing thread breaks, the whole section loosens. The cleanest fix is to re-sew the signature using a binder’s needle and waxed linen thread, which is exactly what learning how to bind a book by hand is all about.
Here’s how to re-sew a single failed signature. Remove the signature from the text block by gently separating it from its neighbors. Fold it back into its original shape. Using your original needle holes if they’re visible, or piercing three to five new holes with an awl along the fold, sew a pamphlet stitch from the center hole outward.
A pamphlet stitch is a simple three-hole in-out-in pattern. Tie off at the center with a square knot. Re-glue the signature back into the text block with a thin bead of PVA along the spine edge and press under weight.
“The most common mistake in amateur book repair is applying too much adhesive. A thin, even coat of flexible PVA, applied twice with complete drying between coats, outperforms a single heavy application every time. Thick glue stays wet too long, soaks into the paper, and creates a stiff, brittle result.”
This consensus view comes from experienced members of the r/bookbinding community on Reddit, a large and active forum where professional conservators and serious hobbyists share repair methods with sourced photographic documentation.
How to Restore Old Books: Archival Considerations
Restoring a book from the 1800s or early 1900s is a different project than fixing a modern paperback. Old books frequently have acid-damaged pages, brittle leather covers, and original bindings that carry historical value. Aggressive repair can actually devalue or destroy what you’re trying to save.
The term book restoration in the archival sense means returning a book to a stable, usable condition without erasing evidence of its age or history.
That’s meaningfully different from making a book look new. If you’re working on something with genuine historical or monetary value, the American Institute for Conservation maintains a directory of professional book conservators where you can find someone qualified to assess the item before you touch it.
For old books that aren’t monetary treasures but still deserve care, here’s what changes in your approach. Use paste rather than PVA for paper-to-paper adhesion since paste is more reversible if you need to redo the repair. Avoid moisture wherever possible on acidic or brittle paper. Use Japanese tissue for any tears or loose pages rather than tape products. And always test your adhesive on an inconspicuous corner before applying it to a visible area, because old papers react unpredictably to moisture.
Before investing in archival-grade restoration, it’s worth checking whether the title on your shelf is one worth that effort Best American Novels of All Time is a reasonable gut-check for whether a battered old copy is a keeper.
How to restore old books also means addressing the storage environment. A repaired old book placed back on a poorly ventilated shelf in a humid garage will re-deteriorate within a year. Ideally, store restored books at around 65 to 70 degrees Fahrenheit and 30 to 50 percent relative humidity. Keep them away from exterior walls, direct sunlight, and basements.
How to Rebind a Paperback: A Condensed Approach
Paperback book rebinding follows the same general logic as hardcover rebinding, but the materials and scale are simpler. The most common paperback failure is that the spine glue dries out and the pages start fanning apart from the cover. This is called a “perfect binding failure,” since most modern paperbacks use a process called perfect binding where pages are glued, not sewn.
To rebind a paperback, fan the pages and scrape all old spine glue off with a craft knife held perpendicular to the spine, then sand lightly with 220-grit sandpaper to roughen the paper edges and improve adhesion.
Apply two thin coats of flexible PVA, allowing complete drying between coats. Cut a strip of text-weight paper to act as a new spine liner and press it onto the wet second coat. Once dry, re-glue the cover by applying PVA to the cover’s spine channel and pressing the text block back in. Clamp and cure for twelve hours.
This approach to diy book binding repair on a paperback costs under $5 in materials and takes about two hours of actual hands-on time, most of which is waiting for glue to dry. I’ve done this to a copy of a cookbook that had completely detached from its cover, and four years later it’s still holding perfectly.
The “Triage First” Framework for Book Repair at Home
Here’s a decision framework I use to assess any damaged book before starting a repair. I call it Triage First, and it keeps people from over-repairing books that need minimal intervention or under-repairing books that need full rebinding.
Step 1: Open the book flat and check the text block.
Are all pages present and attached to something? If yes, the text block is intact. If sections are completely free, you have signature failure.
Step 2: Check the cover attachment.
Can you separate the cover from the text block by hand with moderate pressure? If yes, the hinge or endpaper joint has failed. If the cover is completely detached, you need a full rebind.
Step 3: Check the spine condition.
Is the spine covering cracked, peeling, or missing? A cosmetic spine repair may be all that’s needed even if the structure is sound underneath.
Step 4: Check individual pages.
Are there isolated loose or torn pages outside of signature failure? These need individual tipping-in before any structural repair.
Running through these four checks in order tells you exactly which repair you need. Book repair at home fails most often when people skip straight to gluing without diagnosing what’s actually broken first. The diagnosis takes five minutes. The failed repair from skipping it costs you the book.
How to Rebind a Book: Common Mistakes and How to Avoid Them
The most expensive mistake is using the wrong glue. Elmer’s Glue-All, rubber cement, and hot glue are all catastrophically wrong for books. They either dry rigid and crack, fail to bond paper fibers properly, or off-gas chemicals that degrade paper over time. Bookbinding PVA is non-negotiable. It’s flexible, acid-free, and designed for exactly this application.
The second most common mistake in how to rebind a explained tutorials is insufficient curing time. People lift the book out from under the weight press after two hours because it feels dry. It isn’t. The adhesive hasn’t reached full bond strength. Twelve hours minimum, twenty-four hours for archival work.
Third: using pressure too early. Pressing the book closed while excess wet glue is still liquid will squeeze glue into the text block and stick pages together. Always let the adhesive reach a tacky but not wet stage before applying pressure, then add your wax paper barrier before closing.
Fourth: skipping the mull or spine liner. The liner fabric is the mechanical connection between the text block and the cover. Without it, the bond is purely adhesive, and adhesive joints fail under repeated flexing stress. Add the mull. It takes three minutes and extends your repair’s lifespan from months to years.
Understanding these mistakes is what separates a repair that lasts from one that looks good for a week. And honestly, if you’re going to spend the time on how to rebind a explained process properly, you may as well do it right the first time.
Quick-Reference Checklist for DIY Book Binding Repair
- Diagnose the specific failure before purchasing supplies or starting work.
- Source acid-free, flexible bookbinding PVA, not craft glue.
- Use library-grade book spine repair tape or Japanese tissue, not packing tape.
- Clean the old spine thoroughly before applying any new adhesive.
- Apply PVA in two thin coats with full drying time between each coat.
- Always insert wax paper barriers between glued surfaces and adjacent pages before pressing.
- Include a mull or cheesecloth spine liner for any structural repair.
- Cure under even, distributed weight for at least twelve hours.
- For old or valuable books, consult a conservator before attempting any repair.
- Store repaired books in stable temperature and humidity to preserve the repair.
What “How to Rebind a Explained” Really Means for Small Press Books
If you’re working with small press publications, chapbooks, or hand-printed volumes from independent publishers, the binding choices your printer made matter enormously for how you approach repair. Small press books are often Coptic bound, saddle-stitched, or pamphlet-stitched rather than perfect bound or case bound. Each of those binding styles has a distinct failure mode and a distinct repair method.
Coptic-bound books, which lay completely flat when open and have exposed spine stitching, are repaired by simply re-sewing broken sections with matching linen thread. The structure is transparent and repairable even by a beginner who spends thirty minutes understanding the stitch pattern.
This is where how to bind a book by hand knowledge pays off most directly, because Coptic binding is a hand-binding technique where the craftsmanship is visible and replicable.
Saddle-stitched chapbooks, the kind with a single staple or sewn fold down the center, fail when the center fold tears. The repair is re-sewing with a pamphlet stitch, using new holes if the original ones have torn too wide. For the small press collector who accumulates limited-edition chapbooks, knowing this repair means you can keep those fragile volumes in circulation rather than letting them become unwrapped curiosities in a box.
Book rebinding in the small press world isn’t just about preservation. It’s about keeping the ideas inside accessible. These books were made with intention, and a good repair honors that.
Cost Comparison: DIY vs. Professional Book Rebinding
| Repair Type | DIY Cost | Professional Cost (US Average) | DIY Skill Level
|
|---|---|---|---|
| Spine crack repair | $3 to $8 | $25 to $45 | Beginner |
| Hinge repair (one side) | $5 to $10 | $30 to $55 | Beginner to intermediate |
| Loose page tipping-in | Under $3 | $20 to $40 | Beginner |
| Full paperback rebind | $8 to $15 | $40 to $75 | Intermediate |
| Full hardcover rebind | $15 to $30 | $60 to $120 | Intermediate |
| Archival restoration (old books) | $20 to $50 in materials | $100 to $400+ | Advanced or professional |
Professional costs are based on standard bindery rates from the Guild of Book Workers and common US bindery pricing as of 2024. The DIY cost figures assume you’re buying supplies for a single repair. If you’re repairing multiple books, the per-book cost drops sharply since a $12 bottle of PVA glue will handle thirty or forty repairs.
Conclusion
A damaged book is almost never beyond saving. The process of learning how to rebind a book starts with understanding that most failures are mechanical and repeatable, which means the fixes are too. You need the right glue, patience during curing, and a willingness to diagnose before you act.
From a cracked paperback spine you can fix in forty minutes to a full hardcover rebind that takes a weekend afternoon, book repair at home is genuinely accessible to anyone willing to work carefully and slowly.
The books in your collection, especially the small press titles, the old inherited volumes, the copies with handwritten notes in the margins, deserve more than a recycling bin.
They deserve a repair that lets them keep being read. Pull out that cracked spine book you’ve been avoiding, pick up a bottle of bookbinding PVA, and start with step one. The worst case is you end up with a repaired book and a new skill. What’s the best book on your shelf right now that’s one dropped-spine away from becoming a pile of loose pages?